


Hitching a trailer isn’t rocket science; however, when done incorrectly, you run the risk of completely ruining your rig. No one wants that, so we’re here to guide through the process of hitching and unhitching your rig. Here’s what you need.
Preparation and Supplies
Better over-prepared than under-prepared! First step, make a checklist!
Making a Checklist
To ensure mistakes never happen, we suggest making a checklist and keep a physical or digital copy. On this checklist include all the essential steps to hitching and unhitching your trailer specific to your rig. Even though you may have done it a few times and know exactly what to do, marking things off a list will give you some peace of mind and help keep your trailer in tip-top shape!
What You Need
To make your hitching job easier, you should keep these things on hand:
- proper lubricants
- apron or towel
- rubber blocks
- duct tape
Lubricants
Keep your equipment lubricated according to the manufacturer’s recommendations. Use WD-40 to lubricate the jack on the front of the trailer and a grease gun with high friction grease to lubricate the hitch ball and receiver.
Apron/Towel
An apron or towel is useful to keep your hands and clothes clean. You are working with messy lubricants after all.
Rubber Blocks
Rubber blocks provide traction between your trailer jack and the ground. This means, there’s a lesser chance your trailer will slip off the blocks. And, they’re good for use with your stabilizers.
Duct Tape
You can use duct tape to:
- Mark the correct chain links on your sway control arms.
- Mark all your hitching tools so you don’t lose them.
Hitching
Now that you have what you need, let’s cover those hitching steps you can add to your checklist!
Step 1: Ready Your Rig
Before you hitch:
- Make sure your vehicle is fueled up
- Use the bathroom
- Turn off your refrigerator, AC, and other appliances
- Disconnect all your utilities
- Close and secure all the windows, vents, and hatches
- Close and secure all your awnings
- Put away any antennas you have
- Secure the contents of your trailer
- Move everything you need for your trip to your tow vehicle
- Close and lock the trailer door
- Raise your steps
- Raise your stabilizers
- Ensure your wheel chocks are in place and snug up to the wheels.
Step 2: Ready the Trailer Connection
To prep the trailer connection:
- Remove your hitch lock
- Flip-up the receiver latch into the vertical open position
- Use your jack to raise the front of the trailer up
- Lubricate the jack piston while it is extended
If you feel the trailer shift while raising it, stop immediately, and go check your wheel chocks. Their job is to keep the trailer from moving around while you get it hitched.
Step 3: Attach Hitch to the Tow Vehicle
To attach the hitch:
- Position the hitch
- Gently slide it into the hitch receiver
- Insert and secure your linchpin
- Clean off the hitch ball
- Apply fresh grease to the ball
On this list, securing the linchpin is most important. Using one with a lock on it ensures that it’s 100% secure. If you forget this, then you can have your trailer fall right off your tow vehicle while you are cruising down the highway. That could result in a catastrophic accident.
Step 4: Link the Tow Vehicle to the Trailer
Once you’ve prepped and raised your trailer, you’re ready to hitch it! It helps to have a spotter, but it’s totally possible to do it solo.
To hitch the trailer:
- Back your tow vehicle into position
- Turn your engine off and safety brake on
- Attach the sway bars
- Lower the trailer
- Close the hitch ball receiver
- Hook up your brakes and lights
- Connect your safety chains
- Remove your wheel chocks
Hitching the trailer is the most complicated part, so let’s go into more detail.
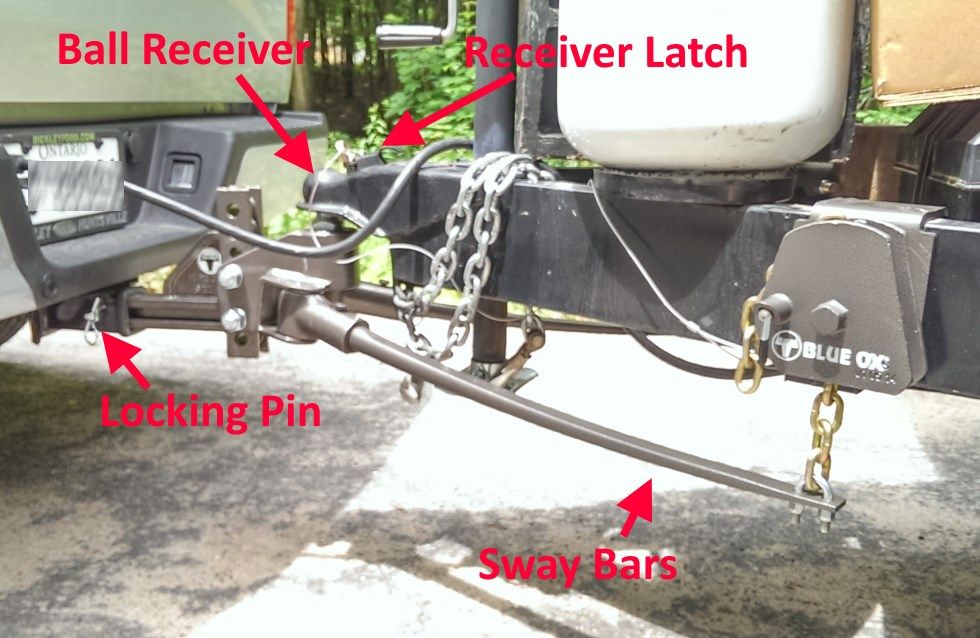
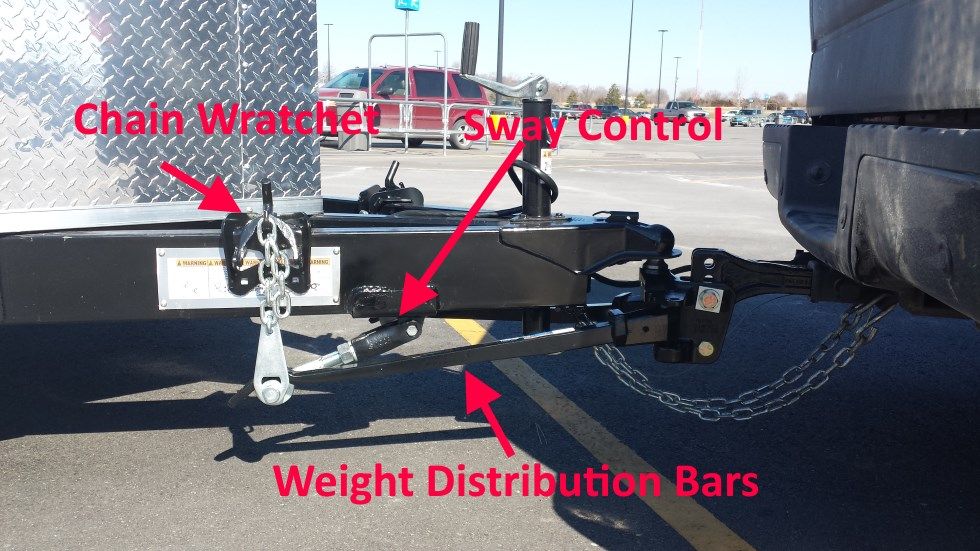
Attach the Sway Bars
All but the smallest trailers should have a hitch with sway control bars and/or weight distribution bars. These create tension in the connection between the trailer and the tow vehicle to help even the weight across the two.
They also provide some resistance to keep the trailer from swaying side to side in the wind while you tow. Both features make it much safer to haul.
My sway bars attach to the trailer via chains that are ratcheted into place. When I had the hitch installed, the dealer determined the correct amount of links I needed to attach before locking them into place.
So that I never forget which ones to do, or count incorrectly, I’ve wrapped neon yellow tape around those links. I attach my sway bars before I completely lower my trailer onto the hitch. The lower you take it, the harder it is to get the sway bars ratcheted into place.
Lower the Trailer and Close the Hitch Ball Receiver
With your sway bars on, lower the trailer down until the hitch ball is fully inside the ball receiver. Then, flip the receiver latch closed, locking the ball in place. Much like the hitch pin, if you don’t do this, a big bump could de-couple the hitch and lead to an epic disaster.
At this point, you can raise the jack all the way up and remove your jack blocks. This is a great time to clean the jack blocks and the bottom of the jack foot.
The lubrication you use on the jack piston can dribble down and make both slippery. That is a very bad thing as it could lead the jack to slip off the blocks when un-hitching. I know this from first-hand experience.
So, wipe both off at this stage with a towel. Check to make sure there is appropriate tension on the sway bars.
Hook Up Your Brakes and Lights
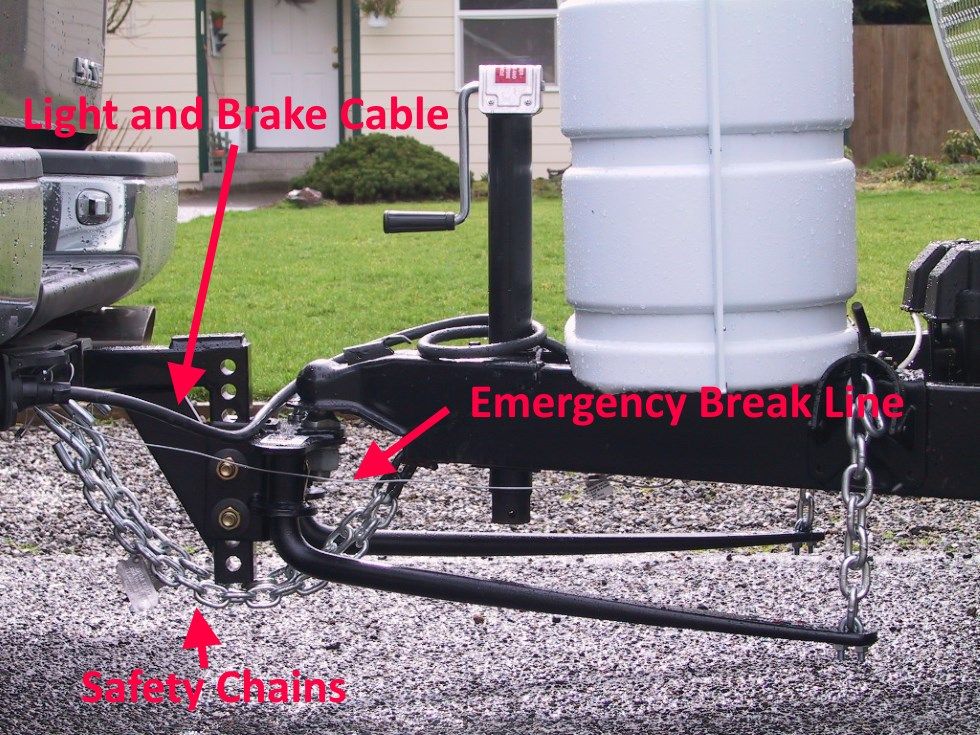
Connect your brake and light cable. This is how your tow vehicle sends brake and light signals to the trailer while you drive. You need to make sure it is well seated. I like to blow out any dust from the cable before attaching it to reduce corrosion and wear.
Next up is the emergency brake release. This device attaches to the safety chain loops on the hitch receiver of your tow vehicle. Its job is to automatically engage your trailer brakes if the tow vehicle and trailer should become separated. It is not there to save your trailer so much as to keep it from barreling down the highway and smashing into other vehicles.
Connect Your Safety Chains
These are your last line of defense in keeping your trailer attached to your tow vehicle. If the hitch receiver or ball receiver should fail or you forget to lock them, these chains are supposed to keep the trailer connected to your vehicle.
You want to make sure these are not dragging on the ground, but keep in mind that twisting them up reduces their tensile strength. Thus ideally, you want safety chains that are just the exact length you need so that they remain hanging a bit loose, but not touching the ground.
Step 5: Roll Out
Do a final check around the trailer to make sure you didn’t miss open windows, latches, or forget any camping gear. Then, check your lights, brakes, and signals to make sure they’re working properly. If your trailer lights don’t work, check that the light and brake connectors are plugged in.
Once you’ve checked everything, you’re ready to roll out!
Unhitching
Unhitching your trailer is way less danger-prone than hitching. That said, there are still things to pay close attention to.
Step 1: Get Situated
Once you’re parked:
- Get your wheel chocks and make sure they’re snugly fit.
- Make sure the area under your jack is as flat as possible.
- Place your rubber pads down on the ground where the jack will land.
- Lower the jack with the foot centered on your pad.
- Run it until the trailer just start to lift up, then pause.
Step 2: Disconnect
Next:
- Disconnect the brake cable, emergency chains, and emergency brake controller.
- Run the jack to lift the trailer high enough for the tension on the sway bars can be uncoupled with minimal tensions.
- Lower the trailer until you are sure to be putting some weight on the tow vehicle.
- Lift the ball receiver lock to release the hitch ball.
Step 3: Uncoupling
With the ball unlocked:
- Lift the trailer on and off the hitch ball. This can be tricky if there’s tension between the tow vehicle and the trailer that will cause it to lift up rather than come free. If this happens, just gently push down with your foot to free the ball or have someone take the vehicle out of park to relieve the tension.
- Drive the tow vehicle forward.
- Use the jack to get the trailer into a nice level position.
- Put your hitch away.
Safe Travels!
You now know all that I have learned about safely hitching and unhitching a travel trailer. Go forth, and have wonderful adventures with one less thing to worry about on your next RV trip!